Guidelines
At Printtrio, we offer free artwork set up so all you have to do is just send the design to us. However, we get a lot of inquiries about how to set up artwork for production. We have listed the following simple steps in order to understand the process and prepare your artwork for different designs.
How to set up artwork files for production
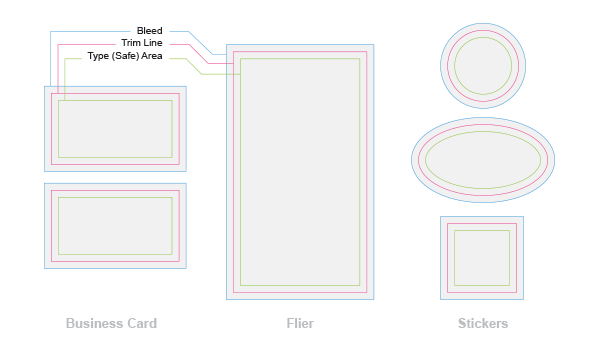
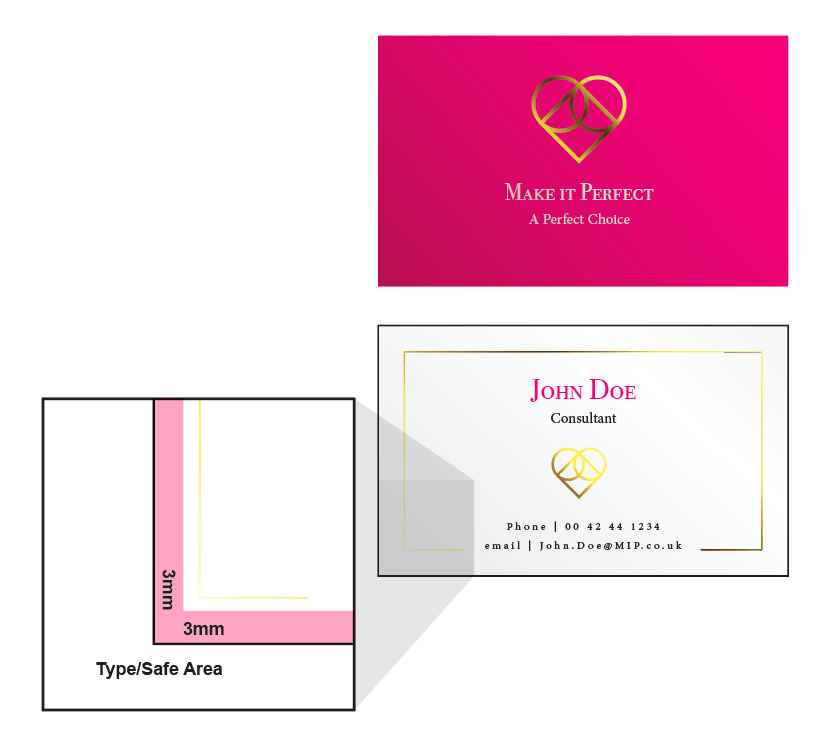
Every artwork file has three main aspects to consider: type area (or safe area), trim line, and bleed. Design elements and other important information should stay within the type or safe area. It is usually 3 to 5 mm inside of the trim line. Everything beyond the type or safe area is usually for background colors, extended images or illustrations, and the bleed in general. Since there might be a slim margin when applying the trimming on the trim line, the area from the type or safe area till they bleed is to make sure your design does not get cut off.
Please note that the trim line can be straight cuts or custom-made cuts. Here are some examples to illustrate the difference.
Types of Images
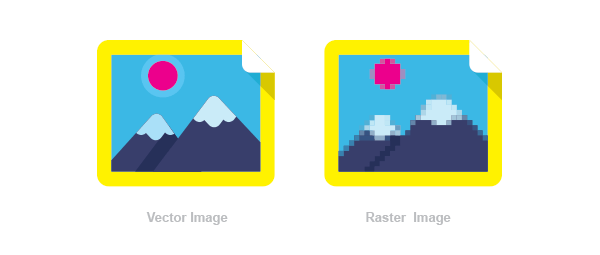
There are two types of images; Vector-based images and raster images.
Vector images:
Scalable to any size and it is made of shapes and lines. It comes with extensions like AI, EPS, and SVG and usually created and edited using Adobe Illustrator or Corel Draw.
Raster images:
This type of image is made up of pixels and usually photographic. Its resolution needs to be at least 300DPI at print size to get the right quality when printed, otherwise, images will link blurry and pixilated. It is usually edited using Adobe Photoshop or CorelPaint.
File Types:
In order to print your artwork, it must come in one of the following extensions (formats): AI, PDF, EPS, SVG, PSD, TIFF, or JPG. Artwork should be in vector or raster format, 300dpi resolution, has the right size intended to be printed in, and in CMYK color mode.
Why CMYK color mode:
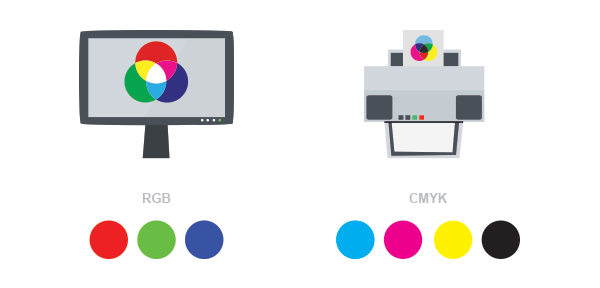
There is a difference between RGB and CMYK. RGB are the primary colors that are used in monitors, screens, and cameras, and scanners. They are usually brighter than CMYK and used to define how colors appear on screens and monitors. CMYK are the primary colors of pigment; Cyan, Magenta, Yellow and black, and used to define how colors should look on a printed medium.
Foil and Spot UV
The following will help you prepare and provide the artwork for items with a Spot UV or Foil finish by following a few simple steps. It is slightly different to provide artworks with foil and Spot UV from providing other normal artwork files. You will need to do the following for us to make sure we’re able to recreate your design to your:
- Provide an artwork with an extra layer showing where the Spot UV or Foil finish should be applied.
- Make sure these designs are clear of edges, folds, and perforations to prevent any flaking in the production.
We will explain that in detail.
First, providing an artwork with an extra layer showing where the Spot UV or Foil finish needs to be applied:
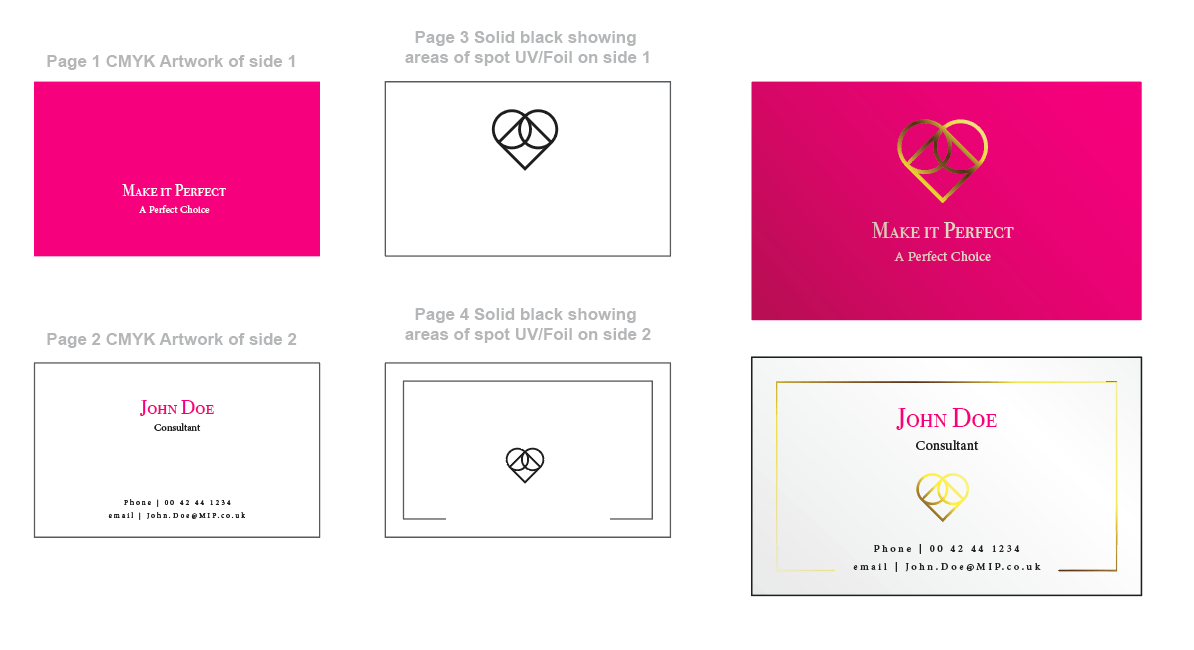
When supplying artwork for a single-sided Spot UV or Foil finished product, you should prepare two pages of artwork:
Page 1 should include all artwork elements, except the Spot UV or Foil finished areas.
Page 2 should only have the Spot UV/Foil artwork solid 100% black. No shades or gradients
These requirements should be for each side of the print. So, in case you have a two-sided design, the whole artwork should include four pages if you want to have foil or spot UV on both sides.
Second: Make sure these designs are clear of edges, folds, and perforations to prevent any cracks or flaking in the production:
There are a few factors you need to consider when preparing your vector files to show where your spot UV or Foil finish should be:
- Spot UV or Foil areas should be contained in the type/safe area as mentioned above in the type/safe area guidelines to ensure your spot UV/Foil is not trimmed.
- Spot UV or foil areas should not be on any fold or perforations lines to ensure you get the best result from the spot UV / Foil and not get any cracks or flakes.
How to provide your artwork files for boxes with lids:
No matter what design software or platform you use to prepare your designs, we have come up with easy-to-follow steps to ensure you provide us with the artwork to apply to your box of choice and get the best result possible. Please follow these simple guidelines to set up and prepare your files for output.
Each box consists of two pieces: a lid and a tray. You need to provide us with the designs for each piece depending on your choice of print, whether you want a lid print only or a full print (lid and tray).
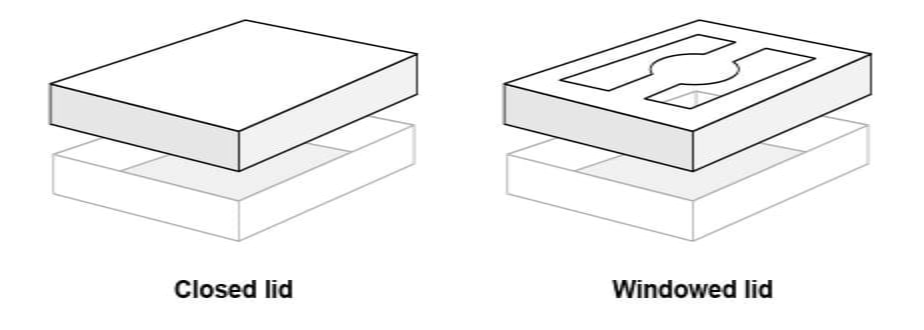
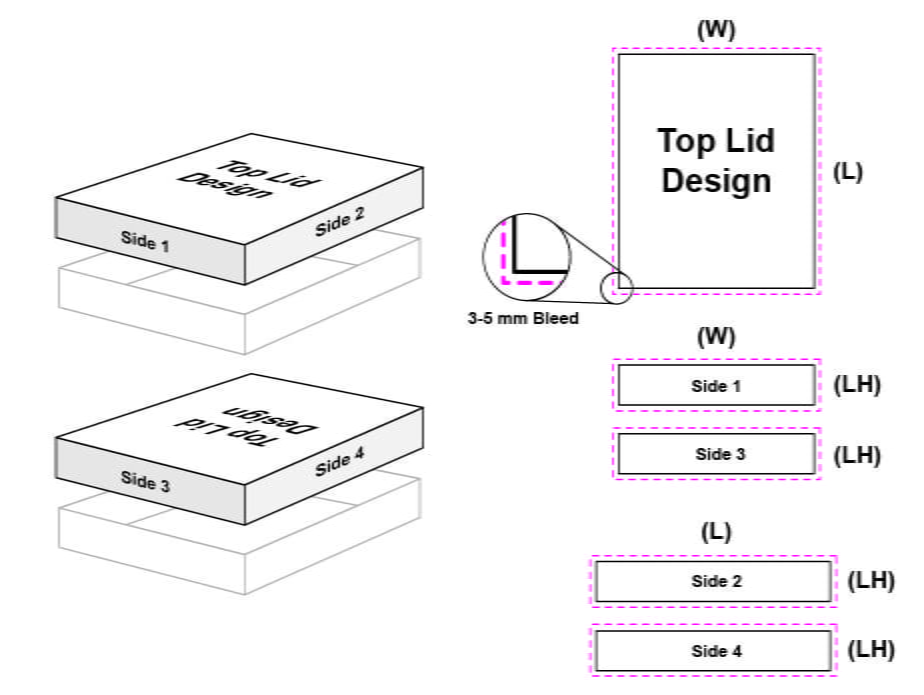
Lid print:
There are two types of lids: closed and window, as shown in the illustration below.
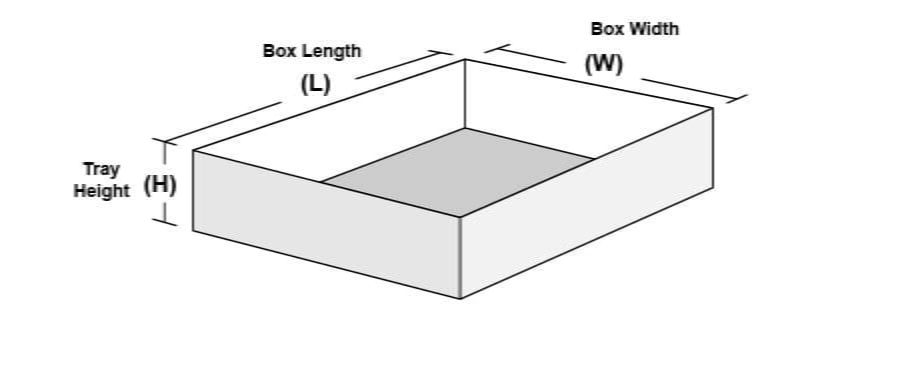
Each lid has three dimensions, a width, a length, and a height (W x L x H), as shown in the illustration below.
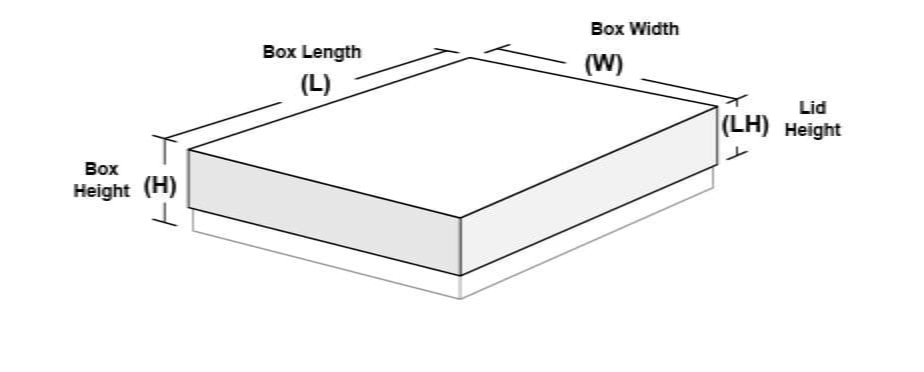
We offer four different heights on our platform: (40mm, 50mm, 70mm, and 90mm), and 80mm for cupcake boxes. It is important to note that the height of the lid is slightly shorter than the box height to ensure the visibility of some design elements from the sides of the tray. Therefore, based on the overall height of the box, the lid height should be 35mm high for 40mm and 50mm box heights and 40mm high for 70mm and 90mm heights, as shown in the table below.
| Box height | Lid height |
|---|---|
| 40mm – 50mm | 35mm |
| 70mm – 90mm | 40mm |
You have to provide the artwork for each of the five sides in the illustration, plus an extra 5 mm bleed, as shown below.
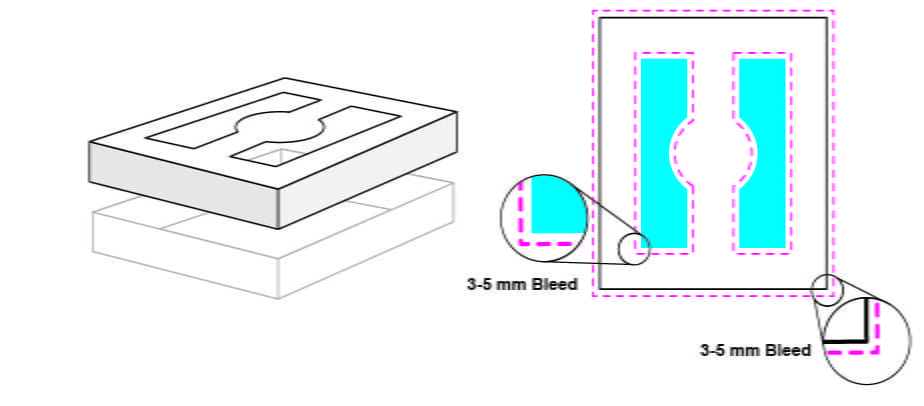
For the windowed lids, and long with your design file, you can draw a basic shape of the window using a distinctive color (like cyan or magenta) and at least 20mm away from the box’s edges to prepare the necessary die-cut. Please refer to the illustration below.
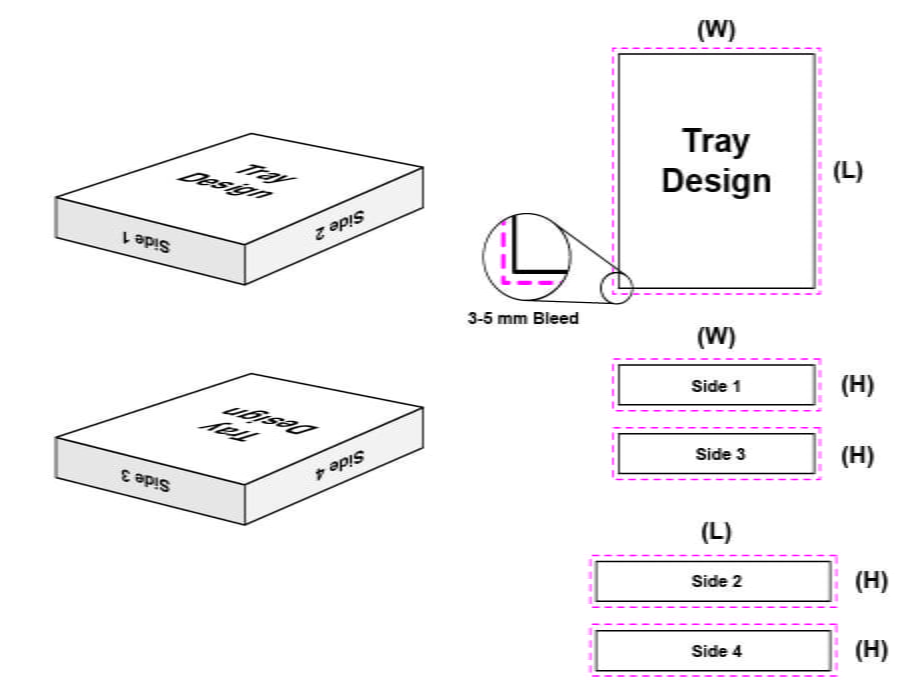
Tray print:
Each tray has three dimensions, a width, a length, and a height (W x L x H). We offer four different heights on our platform: (40mm, 50mm, 70mm, and 90mm). It is important to note that the sides of the tray should be equal to the height of the selected box, as shown in the illustration below.
You have to provide the artwork for each of the five sides in the illustration, plus an extra 5 mm bleed, as shown below.
Once all sides are ready, you can have them in AI, PDF, PNG, or any printable format, with 300DPI resolution. Next, create a zip file containing all sides of the lid and another zip file for the tray sides and upload them before checking out. Rest assured that our team will be contacting you for any assistance or clarification to ensure getting the best result.